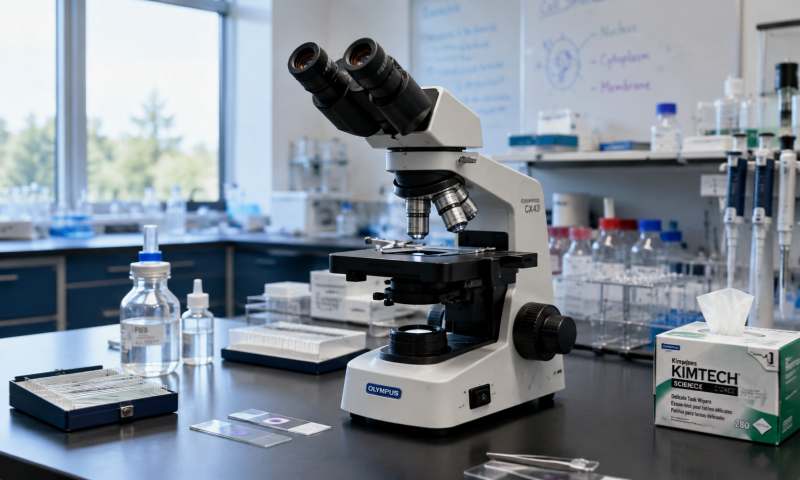
A biological microscope is a precision optical instrument widely used in biological research, medical diagnosis, cell observation, and laboratory teaching. The clarity of microscopic imaging directly depends on the cleanliness of optical lenses, mechanical structures, and external shells. Dust, fingerprint stains, oil stains, residual culture solution, and airborne pollutants can cause blurred images, reduced resolution, light scattering, and inaccurate observation results. Long-term uncleaned contamination will also accelerate lens aging, corrode mechanical parts, and shorten the service life of the microscope. Therefore, standardized daily cleaning and maintenance are essential to ensure stable instrument performance and clear imaging. This article systematically introduces the dedicated cleaning materials and complete step-by-step cleaning procedures for biological microscopes, providing standardized guidance for laboratory daily maintenance.
Essential Cleaning Materials for Biological Microscopes
Cleaning a biological microscope requires professional, low-corrosive and lint-free materials to avoid scratching optical lenses or damaging instrument components. The first essential material is optical lens cleaning paper. Unlike ordinary tissue paper, it is lint-free, soft and ultra-fine, which can effectively wipe off dust and fine particles without leaving scratches or fiber residues on the lens surface. Secondly, professional lens cleaning solution is indispensable. It is specially formulated to remove fingerprints, oil stains, and water marks on optical lenses, featuring low volatility, no corrosion and no residue, which is safer than ordinary alcohol in high-precision lens cleaning. In addition, soft microfiber cleaning cloths are used for wiping instrument shells and mechanical parts, with strong dust removal ability and no wear on surfaces. Absorbent cotton swabs are applied to clean tiny gaps such as objective lens threads and condenser gaps. Clean distilled water and a small amount of neutral detergent are used for cleaning non-optical contaminated shells. Finally, a portable rubber air blower is used to remove surface floating dust before wiping, which is the key to avoiding secondary lens scratches.
Standard Cleaning Procedures for Optical Components
Optical components including eyepieces, objective lenses, condensers and light filters are the core parts of the microscope and need the most delicate cleaning. Before any wiping operation, use a rubber air blower to blow away all floating dust and granular impurities on the lens surface. Hard particle residues must be removed first; otherwise, wiping directly will cause irreversible scratch damage to the lens coating. After dust removal, fold the lens cleaning paper into a small square, drop one to two drops of special lens cleaning solution, and gently wipe the lens surface in a single spiral direction from the center to the edge. Do not repeatedly wipe back and forth. For stubborn oil stains and fingerprints, replace new cleaning paper and repeat the wiping operation until the lens surface is clean, transparent and free of water marks and streaks.
For small gaps and low-power objective lenses that are difficult to wipe, use sterile cotton swabs dipped in a tiny amount of cleaning solution for precise local cleaning. After cleaning the optical lenses, place the eyepieces and objective lenses in a dry and dust-free environment for natural air drying, and avoid using external tools to dry them to prevent residual fiber contamination. The condenser and field diaphragm also need regular dust blowing and wiping to ensure uniform light transmission and avoid dark shadows and stray light during imaging observation.
Cleaning Steps for Mechanical and External Structural Parts
Mechanical and external structures include the microscope base, arm, focusing knob, objective lens converter, and stage. These parts are prone to accumulate dust, residual biological liquid, and hand sweat stains during long-term use. First, turn off the microscope power and unplug the power supply to ensure safe operation. Wipe the metal and plastic shell with a dry microfiber cloth to remove surface floating dust. For stubborn stains and liquid residues, dip the cleaning cloth in a small amount of diluted neutral detergent, wring it dry completely, and wipe the contaminated area gently. It is strictly prohibited to use strong corrosive solvents such as acetone and high-concentration alcohol to wipe the plastic shell, so as to prevent shell aging, fading and cracking.
Clean the stage surface and sample fixing clamp regularly to remove residual cell culture solution, dye liquid and dust, ensuring the stage is flat and clean for sample placement. Wipe the coarse and fine focusing knobs to keep the rotation flexible and free of dust jamming. After all cleaning work is completed, place the microscope in a dry, ventilated and dust-free laboratory environment, cover it with a special dust cover, and complete daily maintenance records.
Daily Maintenance and Cleaning Precautions
Daily standardized maintenance can effectively reduce the frequency of deep cleaning and prolong the service life of the microscope. Develop the habit of dust blowing and simple wiping after each use. Avoid touching the optical lens surface directly with fingers during operation to prevent fingerprint oil pollution. Regularly check the lens coating for damage and ensure the cleaning materials are kept dry and clean. Do not use expired or contaminated cleaning solution. In addition, keep the laboratory environment dry and clean to reduce floating dust and humid air corrosion. Scientific cleaning and maintenance can always maintain the microscope’s optimal imaging state, ensure the accuracy of biological observation and experimental analysis, and reduce instrument failure rate and maintenance costs.